Showing posts with label kidspiration. Show all posts

Saturday, October 22, 2011

Purposeful Work in Preschool

This year I am delighted to have the preschool three and four year old classes visiting my room. They are coming to do whole group and individual work on the computers. It's going to be an exciting new look at student learning from my perspective. I want to begin tracking our projects.

Finding Resources
The classroom teacher and I began thinking about the types of learning that the PreK3 students are doing in class. They are working on colors and shapes. I searched using Google's Advanced Search. My search terms were preschool shapes because I wanted both the word preschool and shapes on the page I would find. Under the File Type drop down list, I selected Shockwave Flash (.swf). A few hits down the list I came across an adorable game called Purpy's Shapes.

Here is an interesting aside: When I searched using the Advanced Search option and chose the link, I only get the game filling the whole browser screen. If I go directly to the sheppardsoftware.com web page, I still get the game, but it is surrounded by advertising. This makes the web page so much better for preschool children.


Once I knew that Sheppard Software had a great game, I went directly to their web site to investigate other flash games for preschool. I found Bloople's Colors


Whole Group Work - PreK3
The classroom teacher and I introduced the activity on the interactive whiteboard. We read the words on the screen and taught the children how to use the pen to select and drag items on the screen. They enjoyed the activity. I told the students we would work on my "big computer" this week and that they would return to work on the "little computers" next week. We started with Bloople's Colors.


Individual Work - PreK3
When the students returned, they learned how to sit on their bottoms on the chairs with wheels. I had them all raise their left hand and explained that they would need to press the left side of the mouse (the same side they had raised their hand) to make the mouse work. Most students had no problem. About a quarter of the three year old students needed extra help. To make life simple, I went to those computers and disabled the secondary mouse button. They will build those skills over the course of the year.


Whole Group Work - PreK4
The four year old students were working on patterns. Rather than using Kid Pix or Tux Paint to build patterns, I decided to use Kidspiration. The screen is much less cluttered and I felt they would be more likely to concentrate on the task rather than trying to draw.


As a whole group, I taught the students one step at a time how to use the Kidspiration program through increasingly more difficult patterns. I have the entire lesson on my lesson wiki.


Individual Work - PreK4
We followed up the group work one week later with individual work on the lab computers. The only thing I forgot to do was switch the icons to the bottom of the page to match the set up I used on the interactive whiteboard. They adapted quickly and had so much fun with their patterns.


Next Steps
It looks like the PreK3 and PreK4 students and teachers are enjoying their work in the computer lab. I will post more ideas as we continue through the year. I'm so excited to work with this age group!

Saturday, March 6, 2010

Introduction to PowerPoint in the Third Grade


Click the play icon then the cc icon to see the page notes.

We have finished our third grade bird research project. My intent was to have the students read for content in a web page and write their own sentences about what they learned. With each research assignment, we used a new tool.

PowerPoint as a Writing Tool
I placed a PowerPoint file with the glyph from the Winter Wonderland project in each students folder on the file server. It gave the students their first experience with the file server. We talked about how the files on each computer are "locked" on that computer's hard drive. The file server is connected to each computer in the building, so we can share its hard drive.

The students arranged the parts of the penguin into an individual representation and learned to use the notes section. They wrote sentences telling what each part of the penguin represented. For example, they used one color beak if they like warm weather and another color if they liked cold weather. They wrote five sentences in all to describe the glyph. Next they added three sentences telling what they knew, for sure, about birds.

Learning About Our State Bird
Next, we reviewed what the students might know about the Eastern Goldfinch - our state bird. I did not tell them if they were right or wrong with the details about the eastern goldfinch. The following week, we looked at the flip chart while holding a printout from Little Explorer's Picture Dictionary. I would show a question and the voting results, such as where does the eastern goldfinch live. I asked them to read the page and stand up when they thought they found the answer. Everyone was successful in finding all the answers.

At the end, they retired to the computer and Kid Pix to draw the eastern goldfinch by following the outline on the Little Explorer's printout.

When they returned to class the following week, I had each of their images on the second page of their PowerPoint. They chose five details to share with the class about the bird.

Comparing the Penguin and the Goldfinch
The final activity was creating a Venn diagram in Kidspiration to compare the penguin and the goldfinch. I made a template, which I will place on my project wiki. They found three facts that only apply to penguins. Three facts that only apply to the goldfinch and three that both birds shared.

When they returned the following week, they added three sentences to the PowerPoint slide that contained their Venn diagram. They wrote three sentence: what they liked most about penguins, what they liked most about goldfinches, and one sentence telling why they thought the birds were more similar or more different from each other.

A First Presentation Experience
The work culminated in the students standing at the front of the room, reading their PowerPoint notes, and advancing the presentation by tapping the Activboard with the stylus. They did a great job speaking loud enough for the class to hear, being a good audience member, and switch from one piece of paper to the next - a big juggling job.

All the presentations are on the computer class wiki.

Saturday, February 20, 2010

Be Cyber Smart and First Grade

Every year I work through several Internet safety and citizenship concepts with all the various grades. This week, I am reviewing a computer ethics topic titled "Is This Yours?" at the CyberSmart web site.

Be Cyber Smart
In general, I like the CyberSmart! Student Curriculum. They have lessons in:
  • Safety and Security Online
  • Manners and Cyber Citizenship
  • Cyberbullying
  • Authentic Learning and Creativity
  • Research and Information Fluency
  • Twenty First Century Challenges
When the link is clicked on the menu on the left side of the screen lesson plans and student activity sheets are revealed. The lesson plans are great. They walk the teacher through an overview, objectives, NETS standard, and provide a list of materials, an introduction, and step by step lessons to teach.

From Simple Concept to Analysis
The simple concept behind the lesson on Is This Yours? is that children have to realize that computers in the school are property that must be respected. It comes with a little coloring sheet for use in the discussion. I've rearranged my room and it will be harder for the students to color than in previous years. I've modified the experience by putting together a template in Kidspiration.

Kidspiration Template
This week we will use the template to find three pictures representing items the student may or may not need permission to use. I've placed the template on my wiki. They will then switch to the writing view and add a sentence for each image telling why they do or do not need permission to use the item. The final work will be imported into Word and turned into a single paragraph. I think this extension should help them analyze the lesson using images that might more closely represent their personal experience.

CyberSmart's lesson is a great beginning discussion in digital citizenship. I am looking forward to the complementary Kidspiration template enhancing the content.

Saturday, January 30, 2010

Kidspiration in Kindergarten and First

I have had Kidspiration 3 in the lab for a full year. I'm just starting to get comfortable with the program. I think it will become a very useful tool in Kindergarten and first grade. I've learned how to use the Teacher menu and still have more to learn, but I'd like to reflect on some lessons I've learned.

Kindergarten Colors
The first project I am working on with Kindergarten is sorting by color. This project is intended to introduce Kidspiration to my Kindergarten students for the first time. I found a clear canister icon and dragged three onto the screen. It is actually a terrarium. I labeled one red, one blue, and one yellow. I clicked on the resized terrarium and made it a Super Grouper item by clicking the icon shown on the right and choosing Create SuperGrouper.

I didn't want to give the Kindergarten students so many symbol choices. I know that some of the built-in projects do not have all the symbol libraries. It was then that I noticed the Teacher menu. It is very easy to use the Save With Activity Wizard menu item and select particular libraries.

The actual lesson and Kidspiration file are on my wiki page.


First Grade Colors Extension
I was able to use the same file with the first grade since I did not use Kidspiration with them in Kindergarten. I extended the project with Kindergarten by having them switch to the writing mode.

On day one, they wrote very short sentences telling which color was their first, second, and third favorite of the three colors. They wrote short sentences stating color of the icons dragged into the buckets. On day two, they exported the work to Word and deleted the blank lines between sentences. This will help them eventually turn their outlines in Kidspiration into actual paragraphs in Word.


A Question I Received
As I was working on this project, I had a quick exchange with Christy Tvarok Green. She asked me if you can "freeze" a template in Kidspiration. I was able to find this option on the Teacher menu. I chose Select All items on the page and from the Teacher menu choose Locked Item. Now when I open the template, students can still type in boxes and move images to a box, but they can not move or delete the boxes. This will be very helpful in the early grade classes.

Thursday, April 9, 2009

Slideshare for Classroom Wiki

Over the years, I've wanted a method to gather student works for display on the Internet. The reasons are three-fold: to share the work with parents, to cut down on printing costs, and to give the students a more permanent record of their work with me.

PowerPoint/ JPEG Combination
Most of the programs I
use in class can generate JPEG images. I've recently been placing classroom PowerPoint and Activstudio flip charts in Slideshare to help explain my work on my blog.

I decided to bring many examples of my third grade student's work home and try to create PowerPoint slides. It worked well. I have 22 students. They have worked in Word, KidPix, and Kidspiration on various projects.

How I Will Use the Content
Over the years, I have sent home letters to the parents to show the work we complete i
n computer class. It can be a waste of paper and photocopying supplies when students forget to pass papers on from their backpack to their parents.

This year, the school included a spot for parents to share their email address if they wished to receive information from the school. I decided to collect the email address and create an online newsletter. As of April 9th, I am still tweaking the newsletters. I hope to send a link to th
em by the end of Easter break on April 20th.

Basic Logistics

Many pieces of work are stored on our school file server. The files are stored by class (e.g., 3A, 4A, 4B, and so on). KidPix and Kidspiration are stored on local drives. It took about a half hour yesterday to create an EasterBreak folder on the server, create subfolders for each grade, and slide the files from the local drive to the hard drive.

For the KidPix projects, I was already saving the files as JPEGs in the Documents folder. The Kidspiration files end up in the Documents folder by default. When I returned home last night, I opened the Kidspiration files and Exported them as JPEGs.

It didn't take too long to create the PowerPoint file, slide each JPEG to a Title Only slide from the folder on the desktop, resize or crop the image, and upload the finished PowerPoint to Slideshare.

Tweaking Slideshare
My only hesitation about the whole process came after loading a few sample Slideshares to the wiki and viewing them. At the end of the series of slides, it shows "related" slide shows. I searched their FAQ to see if they could be removed and then decided to take a closer look at the individual screen for a slide show. I noticed a tiny link labeled Custom underneath the embed code. I was so happy to see there was a second embed code titled "Without related presentations". Now I have all 22 presentations embedded on the wiki.

I will be able to save the wiki page to the school delicious account. The students can view each other's work when they finish the planned project when we return to school. They will be linked to via the online newsletter.

It's great when a plan comes together.

Thursday, January 29, 2009

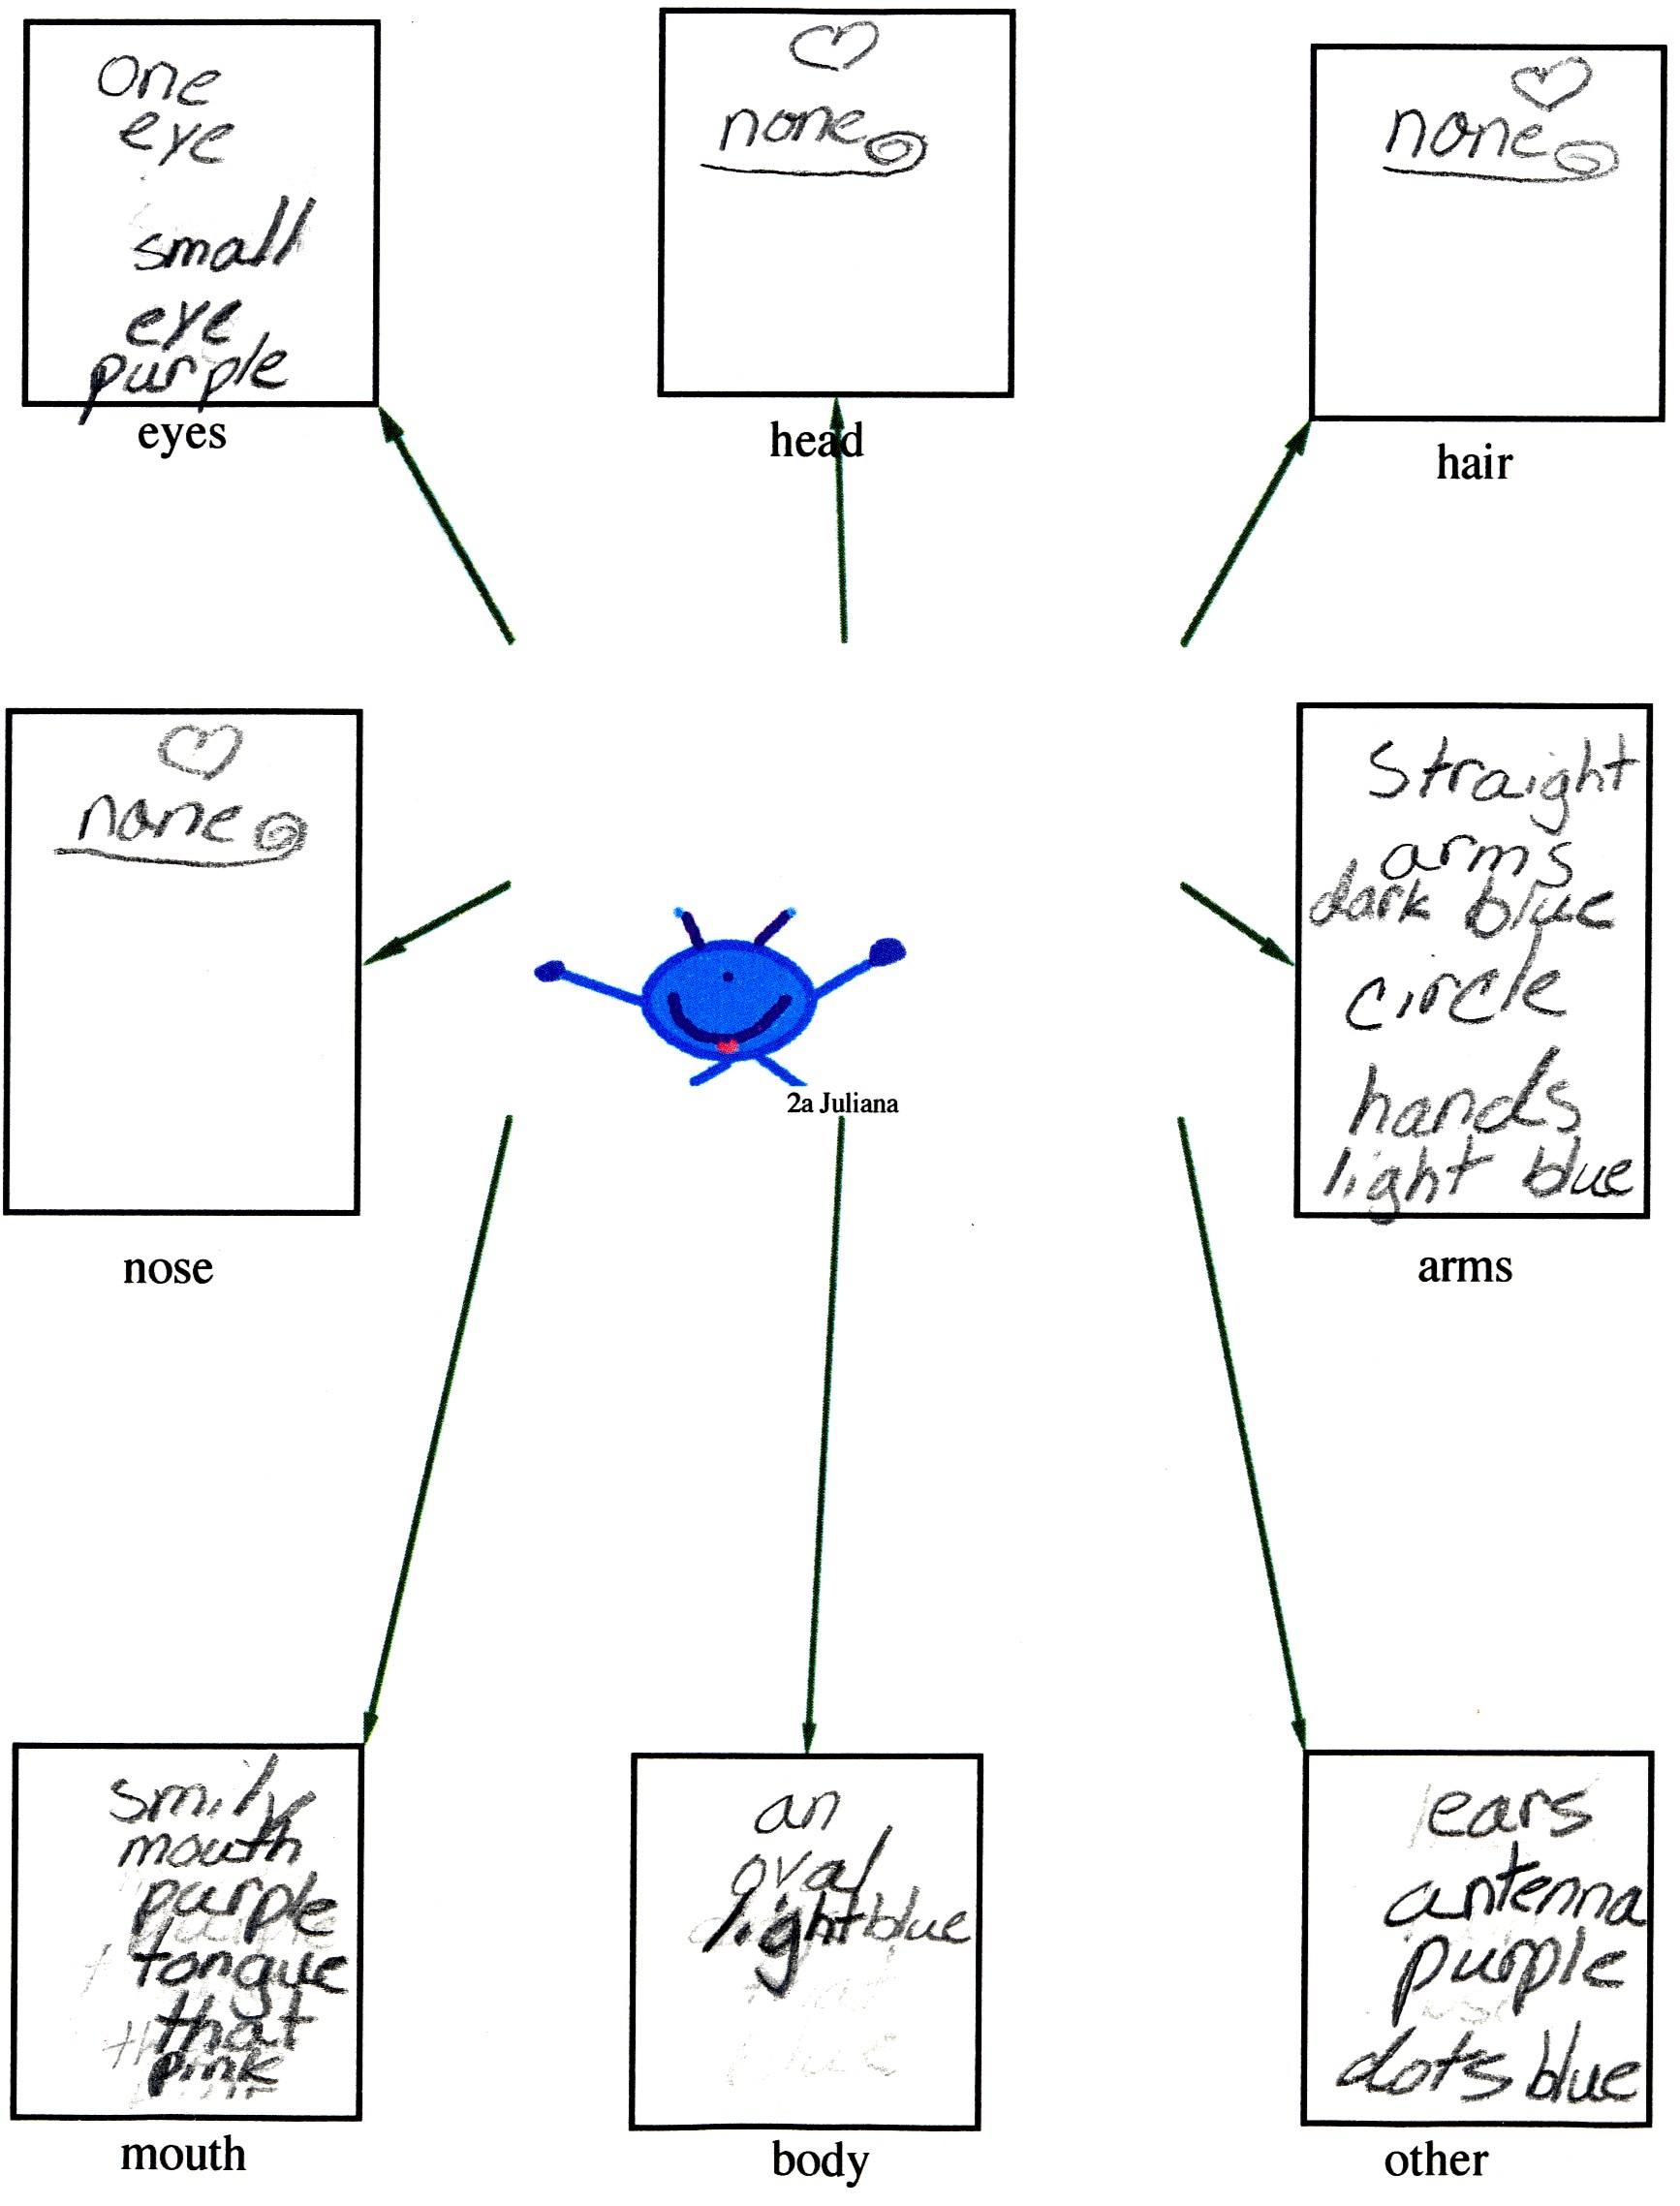
Monster Project Year Two


Click on the image for a larger version.


This is my second year working on the Monster Project through Wikispaces with Anna Baralt. Things are going much smoother this year because I had it planned in advance. Last year I jumped in with two feet and just ran with the drawing and the writing.

Much More Prep
The students have listened to Many Luscious Lollipops and found adjectives from last year's monster wiki descriptions on the Activboard. The found their favorite food on Kidspiration 2 and completed the chart for adjectives representing the feel, taste, smell, sound, and sight of the food.

We Drew the Monsters
The second grade teacher said the writing portion of the project was very hard last year because the students didn't use standard, easily defined shapes. This year I recommended that they use circles, ovals, rectangles, triangles, and other shapes they could name for the body parts. We also talked about straight, curved, and curly lines.

Kidspiration Template for Monsters
Last year, Anna said she used a worksheet to help the students develop the monster adjectives. I made one based on the image in our Monsters Bloom in Our Wiki presentation from the K12 Online Conference. Already I see that I should include a box for legs. I will add the template to the Monster Project wiki tomorrow. I showed the second grade teacher and she feels that this will give her a huge leg up on creating the actual monster descriptions in class.

I think it will take two classes to fill in the template. We are probably about 75% complete. It is great because they are filling the chart in pencil. They can bring the chart over, I can point out what might be missing (such as a number, size, position on the body, shape, or color) and they can go back to try again. We will listen to Go Away Big Green Monster during the next class and follow it with Hairy, Scary, Ordinary: What is an Adjective for the second template filling class..

I'm So Lucky
I did offer to have the students create the descriptions in computer class, but the teacher is really excited to help the students. Once the templates are complete in about two weeks, she will help them write the descriptions in class. At that point, they can be typed into Word and shared with our partner classes.

Monday, December 29, 2008

Activboard Adjectives


A couple of weeks ago, I went to Kean University’s Going Global conference. One of the new things I learned was an interesting method to use an Activboard. I stopped by for a session offered by the Promethean company. I picked up a tip from one of the presenter’s named Rob. While it is specifically useful for the Activstudio software, the idea could be adapted using Word and the highlighter option.

I learned how to use the Activstudio software by taking their online tutorial. This tutorial was very good as far as learning how to operate the software. The piece I am missing is seeing how outstanding teachers use the board and software with their students.

Activstudio, Text, and the Paint Bucket

I learned that when I am using Activstudio, I could prepare a block of text on a page. Once the text is on the page, the paint bucket will color a full word when it is clicked. Rob gave me
an example of having students find all the nouns (or other parts of grammar) within the text block.

Activstudio and Monster Project Preparation

I decide
d to give this method a try with my second grade students. I wanted to introduce the Monster Project that I will be working on with Anna Baralt and other teachers. Since this is the second time I will be drawing monsters collaboratively, I have work online to show the students.

I began the project by reading the book Many Luscious Lollipops to the students to get them focused on adjectives. After reading the book, I brought my wiki up on the projector with last year’s projects. Last year, I completed the project with second and third grade students. Many of my current second grade students have brothers, sisters, or friends the grade ahead. They enjoyed looking at the original drawings and the redrawn images. Next I found a description written by one of the student’s sisters.

1. My monster has a round, blue body that's outlined in gray.
2. It has six eyes. There are two black, two pink, orange, and blue with pink glasses.
3. It has a pig-snout nose, a small yellow smile, and orange wings on its bottom.
4. It has a black crown.
5. It is plump and short.

6. There are crazy ears (and stubby hair) coming out of its blue ears.

7. It has no arms, but stubby blue, short legs.
8. It lives in a pink area.
9. There is an angry sun with yellow eyes and mouth.


We sat in a circle around the Activboard. Each student took turns looking for adjectives and using the paint bucket to choose a color and click on the word. Each student had at least three turns since the description had so many adjectives. I stayed at the computer behind the projector. As each word was clicked, I asked the students if they thought it was or was not an adjective and why. If the word was not an adjective, I clicked Edit – Undo to reset the word to black.
This is the end result.
One of the second graders told me that this is a great way to learn grammar and that their teacher should learn to use the board, too.

Extensions to the Lesson

So far, we have followed the first lesson with a second lesson using Kidspiration. We are currently using version 2. The Science category has an Explore with Senses template. The students learned to use Kidspiration for the first time. I taught them the basics of selecting a category – Food and Health. They learned to use the blue arrows to move between the Foods, Fruits and Veggies, and Treats categories.

Once they dragged their favorite food to the center of the chart, they attempted to type five descriptive words for each of the five senses.

When we return from vacation, we will look at the student's work and try to find out which words are adjectives that can be used to describe the student's favorite food.
I hadn't completed these preparatory activities first last year, we dove right into drawing monsters and writing descriptions. I know they will be prepared for better descriptive sentences this year.