I'm gearing up to work with drawing monsters with my second grade students on the wiki Anna Baralt and I started a few years ago. At the end of the project last year, I put together a Voicethread to find out what we can do better. I am making some adjustments that reflect those comments. I hope it continues to be a great experience for all involved.
The Voicethread I set up a Voicethread and gave the URL to only those teachers involved in the project. I wanted the information to be restricted to those teacher who participated or will participate with a class. As a result, I'm sharing the questions, the changes I am making, and paraphrased comments - but not the actual link to the Voicethread. The Changes for 2010 Anna and I created a Google doc to help the teachers share their contact information. They now have access to this document. I have added a spot for the teacher to note extended school closings and the start of summer break. Finally, I have added anchors to the wiki so that the teachers can quickly jump within the main page to the row containing their class information.
To Create a Wikispace Anchor I edited the page. The screen already has text with the class number 1, 2, 3, and so on. I clicked next to the number 1 and chose the "Insert Link" icon. Next I chose the tab labeled Anchor. I chose an anchor name, e.g., class1, class2, and on to class52, and then click the "Add link" button. You will see a little anchor symbol where the anchor was added. Now the teacher can go directly to their class. I will bookmark the following link to get directly to my classes:
The Actual Questions 1. Approximately when did you start working with your students? Do you feel you had enough time to work on the project to your satisfaction?
I've learned that we should have a method for the partners to communicate their breaks and when school ends.
2. Was there enough information on the main teacher page to help you keep track of where you and your partner school were on the project? What can we do to improve it next year?
Again, the ability to communicate breaks and the end of school year dates is something I will make sure to include in this year's project.
3. Did you find the email, Wikispaces mail, and discussion tabs useful in communicating with your partner? Do you have suggestions for next year?
It seems like communication overall went very well.
4. Did you use RSS feeds to a reader to keep up with the changes on the wiki? Was it useful, overwhelming, or did you find another method that worked well for you?
Two suggestions were to use email from specific pages and to subscribe to all discussions via RSS, but only subscribe to the main partner page updates.
5. How did you prepare students for the project? What did you do that others may want to try next year?
A photo of a word web created in one classrrom will be uploaded to the wiki.
6. Lessons Learned: What would you do differently to prepare the students to draw the monster? What worked well?
One teacher brought up a description that matched the monster and one that was not very complete from a previous year. They tried to draw the monsters from the description. A lot of students seemed to get it after doing that as a class. It was done at the end of the project, and will be done by this teacher at the start of the project this year.
7. Please share what you learned as your students tried to describe the monster. What did you wish you did? What went really well?
If a teacher only sees a class once per week, it is helpful to have the classroom teacher help get the writing completed in class.
Another point made is to set a base expectation for the descriptive writing. For example, if your student says the head is a red circle is it a red outline with a red fill or is it a red outline with a white fill. This does become confusing rather quickly. Last year I had students specifically write: a circle with a green outline filled with white.
8. How did they day of the drawing go?
Some students tried to draw the original with too much detail.
If the student finds there are details missing, it's important to tell the student to make a choice on their own. If the description does not say what color something is, they should choose a color of their own.
9. What surprised the students about the process? Did they enjoy it? How did you go about comparing the monsters with the students?
Overall, even the students who wrote in great detail enjoyed finding the differences. It was mentioned that a Skype call between the classes at the end of the project would be a great culminating activity.
10. What would you tell someone who had never worked on this project before? What were the difficulties and unexpected benefits?
It's a great project that teaches the students to work on adjectives. It is a great project to get your feet wet if you have not used a wiki as a teacher. Image Citation:
We had a great Skype call Wednesday evening. About half of my seventh grade students returned to the school at 6:30pm to speak to a combined first and second grade class in Australia. We are going to try to send a geocoin from New Jersey, USA to Victoria, Australia via geocaches.
Lessons Learned - Ideas to Keep I sent a permission slip home the Friday before our Wednesday evening call. I asked that the form be returned Monday morning. The form gave all the particulars about the call: who we were talking with, why we were calling, where we were meeting, when we were meeting, how to get in touch with me. I requested the student's name, the name of the person dropping the student off and picking the student up, and a contact phone number for that person.
When school was finished for the day, I made sure I placed all the items required for the Skype call right at my desk. This included a working Ethernet cable, headset microphone, digital still camera, digital video camera, cart with projector and speakers, the geocache box, the geocoin we would be sending, and the permission forms.
I arrived at the school about 20 minutes before the students. I turned on, connected, and tested all the equipment, set up the Promethean board with some pre-work, had a printout of questions with answers that were discussed in class earlier that day, set the video camera on a tripod and checked that it would record, placed freshly charged batteries in the two cameras, and set the chairs in a semi-circle in the room. Five minutes before students were to arrive, I went to the meeting place which was the outside door closest to the room and began greeting students. The first students to arrive were told to go to the room and answer the questions on the Promethean board.
When approximately half of the expected students arrived, I went back to my room and gave one student the task of reading the "script" for the call. I asked them to decide who would be responsible for each question during the call. One student chose to run the video camera to record the pre-meeting. I returned to the back door, greeted the remaining students and explained what was already happening in the room.
Ten Minutes Before the Call I checked with the students to get agreement on who was responsible for each question on the script. I asked if there were any students who did not want to speak. I found out who was using Skype at home and gave a rundown of the Skype program to the rest of the students in the room.
There was an excited buzz in the air. One student asked what would happen if the othe class forgot. I assured the students that the teacher and I communicated via email earlier in the day and we were both ready!
The Call The students had a great time asking questions, getting answers, and answering questions from the first and second grade students. We showed them the geocoin.
I think a Skype call is a huge step in forging a relationship and interest in an electronic project. The students become "real" to each other.
The call lasted about forty minutes.
Lessons Learned - Ideas to Improve Upon At the end of the call, there was still time available before parents would return to pick up their children. I asked the students to help me learn what was good about the call and what was bad or needed to be improved.
They were all excited and felt it was a great reason to return to school at the end of the day. They want to do it again.
The first major improvement I learned was that I need to electronically post the details for the evening in the event of lost forms. One student went to my Schoolnotes page and was disappointed that I did not have times and locations listed for the call. This makes so much sense. I don't know why I didn't think of it myself. I'm always misplacing school forms at home for my sons.
The second major improvement is that I placed a sign on the back door to call up to the open window in my room to be let into the building. The student wasn't sure which window was mine. We decided I should hang a banner out the window so it was easy to find. They all agreed that it was hard to tell which room was which from the outside.
It was a great experience. Now to find out how long it will really take that coin to travel over 10,000 miles!
A short post to nominate some worthy entries for the EduBlog Awards. These are people I learn with and from every day.
Best educational use of a social networking service I learn every day at the Elementary Tech Teachers ning. It was started and is hosted by Nedra Isenberg. Even though it was started as a gathering place for elementary technology teachers, there are many classroom teachers and middle school teach teachers sharing resources daily. I am amazed at Nedra's ability to welcome every member with a personal note. The group has grown from a handful of educators to almost 900 as of this post.
Best individual tweeter Hands down, I enjoy learning everyday with Alec Couros (@courosa). He is a professor of educational technology & media at the Faculty of Education, University of Regina. He shares his classroom with the world, moments from his life, and interesting bits and pieces he finds around the web.
Best individual blog I really enjoy Chris Harbeck's Making it Interesting. Chris shares his thoughts on bringing students an understanding of math in many interesting ways. I taught middle school math and even though I no longer have my own math classroom, I still appreciate seeing how he teaches concepts and engages his students along the way.
Best resource sharing blog Kevin Jarrett's Welcome to NCS-Tech! blog is a staple in my reader. He has a great collection of free resouces that he devines from Twitter, reader feeds, the blogosphere, and beyond. He helps me find resources that I would not necessarily find on my own and gives a great recap on the benefits and potential drawbacks of various tools. Thanks to Kevin for his ability to be well rested on a few hours of sleep and blogging for those of us in search of quality tools.
Thank you everyone near and far who help me on a daily basis.
"Excellence." totalAldo's photostream. 2008 May 10. 2009 December 7. http://www.flickr.com/photos/8357376@N04/2479825451
Last year I created some new lessons for third grade. I want to practice research skills earlier in the K-8 computer curriculum. I used birds and penguins as the starting point. This year, I'm going to continue to develop the bird project. A big thanks again to Amber Coggin at the Winter Wonderland wiki for the glyph!
2009-2010 Pre-Work This year, I started the project with a short word processing exercise. I started a document titled Birds and saved it in each student directory on the file server. This ensures the location of the document when students go to retrieve it in the future.
We reviewed basic word processing rules: one space between words, no space typed before the period or comma, one space after the period or comma, and press return only at the end of the paragraph.
The students were to type five facts they know about birds in a paragraph. Initially, I wanted to review their word processing skills.
Use of the Penguin Glyph Today, we used the same penguin glyph that I used with last year's third grade. I was dissatisfied with simply having the third grade students create the glyph last year. It was the first time I had used PowerPoint below fourth grade, though, so I used the penguin glyph and moved on.
This year, I have more of a plan in place. Today, I introduced the concept of copying and pasting words. It follows a Kid Pix lesson from earlier in the year in which we copy and paste a portion of an image using Kid Pix. I demonstrated opening the Bird document in Word. I highlighted the five sentences and chose Edit - Copy. I demonstrated closing Word and opening the penguin glyph. Next I pointed out the penguin slide and the notes section below the slide. I used Edit - Paste to paste the five sentences copied from the document into the notes section.
We used the glyph legend to tell about our knowledge of reading penguin books and seeing live penguins, our preference for seafood and weather, and the gender of the person creating the glyph.
Finally, I asked the students to tell a little about their glyph choices in the notes section. If they read a penguin book or saw a live penguin, they were to tell more about it. Otherwise, they were to write that they hadn't seen a live penguin or hadn't read a book about penguins. They wrote about the type of seafood they enjoy or that they did not enjoy seafood. The wrote about their gender and weather preference.
I explained to the students that next week they would come up to the front of the class and read their notes from a printout while showing us their slide.
Follow Up in the Coming Weeks I will again have the students use the Activotes to tell what they know about our state bird and compare the state bird with the penguin. We will add the drawing of the Eastern Goldfinch from Kid Pix to a PowerPoint slide and type facts in the notes section. We will again use Kidspiration to compare the state bird and penguin, but this year we will include the chart in PowerPoint and add notes.
By the end of this project, they will have created their own images, completed some research, and created and presented using PowerPoint.
Claire's Penguin Notes (From the Image Above) I know that birds can be small. Birds have wings and can fly. They can have colorful wings and can be beautiful. Some of them eat worms. Birds can be cute.My penguin has a round head because I read a book about penguins in first grade. My penguin has a blue eye because I have seen a live penguin. My penguin has a yellow beak because I like cold weather. My has a body has a heart on its body because I like to eat crab My penguin has yellow feet because I am a girl.
I'm looking forward to developing this idea even further.
It is time for the Daughters of the American Revolution (DAR) essay contest. This makes it the perfect time to review Internet search strategies. As I was preparing, I took a look at a presentation I worked on about three and a half years ago. The changes in how I present and how the students interact with the information has changed for the better - I think.
Although I loaded the screens up to Slideshare, these are JPG exports from the Promethean board.
Slide 1 I started with an image and a quote. It got their attention. The sixth grade, overall, felt like this was a false statement. Most students felt that books were easier to use when finding information. They felt that they often could not find what they were looking for when they used a search engine.
Slide 2 I wanted them to be taken off guard with regards to purpose. I found an image and cut the baseball bat out. They volunteered some purposes for the bat - from hitting a home run to hitting aliens in a video game.
Slide 3 We talked about seeing something out of context and how the big picture changes your opinion.
Slide 4 I had a screen shot of a Google search result for the words transcontinental railroad irish. The DAR essay is "The Completion of the First Transcontinental Railroad". I only wanted the first five entries.
We worked on figuring out Google's results based on what was typed in the search box. You can see from the different colors on the screen what the students were focusing on. We flipped back to this slide a few times as we built the concept.
Slide 5 We looked at the image and I talked about the fact that there could be 12 people outside the hotel room door, but they are out of view. When we flipped back to slide 4, we found there were over 45,000 search results, but we were only looking at the first five. What if entry number 20,000 had just what we needed? How could we find it easier?
Slide 6 I explained that over the next few Fridays, I will share tips and give them time to practice searching. Today's tip was going to focus on the website URL. We flipped back to slide four. I pointed out the URL and we talked about the three parts of the web address. Many start www. It is followed by a word of some sort. It ends with an extension. Sometimes they are three letters, sometimes two.
Slide 7 When I put up slide seven, it initially only had the magenta letters. The students took turns volunteering their knowlege. Sometimes it took a few students to build the whole answer, e.g., .EDU.
Forty-two Minutes Passes Quickly I just got to slide eight when the bell was ringing. Next week, they are going to go on to their computers and try a Google and Altavista search for transcontinental railroad irish. The will report on the first five results. For each entry, they will list the link title, what they can tell about the website from the domain name, and they will look at the page and try to determine if the information would be helpful in their DAR research.
The will then search for their specific topic for the DAR essay to look for a detail they could use in their paper. Write the search engine name they use (Google, Altavista, something else) AND the keywords they searched for.
The following week, we will take their search queries and analyze what they are requesting from the search engine based on what they typed as a query. It should be interesting. I'm generating some ideas to get that accomplished.
As a Comparison Here is the same basic information I provided to my older son's class three and a half years ago. I know I prefer what I did this year. Even if I didn't have a Promethean board, I still could have accomplished the same basic lesson.
I've been using a Time Travel Agency idea for an eighth grade PowerPoint project for the last three or four years. I've modified the project to suit my needs. Each year, I get new ideas and hope to improve on the previous version of the project.
Image License Search This year, I am going to use the Google Apps accounts I created though my mrsoro.com domain. I have enough accounts to assign two students to a decade. Twice in previous years, I had multiple students assigned to one PowerPoint presentation, but it seemed as if some students did a lot of work and others sat and talked. Last year, I had each student create their own presentation but they found it to be too much work.
Next week, I plan to review what the students learned about selecting a license for their fish animations last year. I want to show them the Advanced Image Search in Google. I will have them do their best to find images using the Usage Rights category to find images that are labeled for commercial reuse with modification. It will give us an opportunity to review copyright, creative commons, and the public domain.
Google Presentations I played around with Google Presentations a bit last week. I completed three sample slides to share with the class. I was happy to find out that they will have the ability to add speaker notes in the Google Presentation and those notes will download into PowerPoint! The students will have to split up the work so that they have the required slides completed equally. I was happy to see that if they choose a presentation theme, it will download into PowerPoint.
A Chance to Talk About Alternate Search Engines This week, they will begin to populate the slides with their pictures and notes. As they do so, they will need to delve deeper into their topics. I am looking forward to sharing Noodletools: Choose the Best Search for Your Internet Needs website.
I've been working through a Moodle course from November Learning. I have the opportunity to take their three course offerings through the state of New Jersey. I had a great session with Alan November at Kean University's Creating 21st Century Schools seminar this past week. There are things I want the eighth grade to be reacquainted with before they graduate. The Webliteracy for Educators class is reminding me of many important topics. This project will allow me to combine a variety of search skills in one project.
The fact that these are Google Presentations with creative commons images should help me share the final projects. Something I've never been able to do in the past.
Image Citation: Kalohi, Leslie. "Time-Freezy Hype Slush." Never Cool in School's photostream. 28 Sep 2008. 31 Oct 2009. http://www.flickr.com/photos/nevercoolinschool/2896695077/
There was a conflict with scheduling my use of the tablets today (a problem I like to have) so I had to come up with an extra project last night. I keep a list of future projects on my delicious account and found an interesting idea.
Reviewing Citations Last year, I worked on the idea of saying thank you for images in a PowerPoint lesson for the fifth grade. I wanted to extend that thought in a new way. I do not like to over use PowerPoint and felt that I'd like to use images again.
The lesson found on Pics4Learning's website suggests that the teacher selects a piece of music that students can use with images in Pic4Learnings free photos.
I used EasyBib to create a citation for the music and posted the lyrics, music citation, and link to Pics4Learning on our wiki page.
Learning Ahead I introduced the lesson today. I played the piece and asked the students to think of images that came to mind as they listened. They enjoyed the music, swaying to the beat, humming and singing along. They suggested some images as starting points for each other.
I decided the best way to proceed was to teach them how to make a Bookmarks folder in Firefox. As they found images they would want in the presentation, they added a bookmark.
We're going to import the MP3 into iMovie and add the images to complement the music. The students haven't used iMovie yet. They already have plans to bring the music into Garageband to mix it up. I didn't plan that part of the project. It evolved in class as they asked for the option. It was a great opportunity to talk about the Creative Commons license selected by the artist which allows for remixing of the song.
Overall Plan We will create a title and a series of images for America the Beautiful. The students will include citations for the music and all the images. We will eventually upload the completed movies to our school podcast page and/or my vimeo account. I'll have to determine this as I see the project evolve.
In the end, the students will have 24 versions of the song. We will do a little analysis at the end. The project is still evolving, but it seems like the students are going to have a lot of fun while they are reminded once again about citations AND begin learning about copyright, creative commons, and the public domain.
Image Citation: "America the Beautiful..." longhorndave's photostream. 2006 Jul 15. 2009 Oct 27. http://www.flickr.com/photos/davidw/189892126/
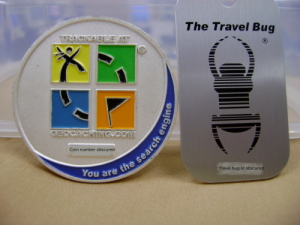
I saw a message on Twitter today that reminded me of a project I've had in the back of my head since last June. A teacher said that her students' geocache had made it from Florida to Washington, DC. She couldn't wait to tell the students. Since I took a few students on a geocache expedition last June, I've had it in mind to purchase some travel bugs and send them on their way. My son is in the picture holding the first cache we located.
Developing the Idea I was talking with my husband and sons at dinner about the DC travel bug. As we were talking, my husband suggested that I start by trying to get the bug to move from our school's town to a neighboring town's geocache. I think that's a good idea to start the project. Next, I thought it might be useful to plant a geocache at my home where I could control things (and have a shorter trip to retrieve the bug).
As we ate, I realized that another "easy" trip would be to send the bug down to Florida to a teacher I'm comfortable working with online. As I continued to eat, I thought about other teachers who are far more comfortable with geocaches. My students and I could learn so much from a collaboration.
In my mind I envision setting up some research for the students. They would learn and create artifacts to show what they learn about longitude and latitude, how their GPS unit(s) work, and what, if anything, they have done with geocaching.com.
As Anna and I developed the monsterproject wiki, we started including information to help the teachers. Based on that wiki I have a getting started, lessons plans, and helpful hints set of links on the new wiki. As other teachers join in they can add to those links.
Let the Games Begin I have created the Google Form below to allow teachers to register so I can start tracking interest in this idea. I'll look forward to sharing a Skype call to brainstorm the lessons. We can all give it a try together and see where it leads.
Last year, I joined Lisa Parisi and Christine Southard on a wiki called Time Zone Experiences. The fifth grade students learned so much and had so much fun that I've decided to work on the project with my new fifth grade students. When I mentioned it to Lisa, she just said I should make sure to invite others and hopes we get many participants. Here is an explanation of the project.
The Project's Beginnings Lisa was talking with Jo McLeay about needing a way to figure out what time it was in different parts of the world. As they spoke, they began to talk about the difficulties in explaining time zones to students. I joined Lisa in the summer of 2008 to set up the wiki and send out the message that we were looking to invite classes from around the world to learn about time zones and seasons.
Students Lead the Learning This project is intended to give students time to investigate the concepts and create projects to show their learning and comprehension. I've started the project this year by having the students write a short paragraph in Word about our current season: fall.
After everyone had a chance to finish their paragraph, we discussed their concept of the seasons. We live in New Jersey. We talked about whether it was fall in Pennsylvania, California, and Florida. I asked them if they thought it was fall in England or Australia. This led to a discussion about the Earth in relation to the sun.
In our next class, we began talking about time. I had them answer a short survey about when they go to bed and wake up. There are questions about whether they have traveled to a different time zone and how their families communicate with others outside their time zone. We will use this information as the students complete the time zone chart in the coming weeks.
With this background information behind us, we took time to research GMT on the Internet. We worked on the Activboard to generate a list of search sites the students use to do research for their teachers. The students sat at their individual computer to try to learn what the letters GMT stand for. As a hint, I told them that we have been speaking about time and seasons. The letters have something to do with these topics. Last year, students were getting confused with other topics that use GMT as an abbreviation.
Each class is forty-two minutes long. This past class I had the students try to find out why Greenwich Mean Time is used, where Greenwich is located, and if they could find out what time it was in New Jersey if GMT is 11:00. We spoke about their research and then began to learn about military time on the Activboard. They began to get a feel for 0:00 being midnight and 12:00 being noon. Everyone had a chance to convert a time on the board.
Next Steps I will be assigning a time period to each student. They will have to determine what is happening in our part of the world at GMT 0:00 through GMT 23:00. This is an example of what the students did last year. We will then roll the information into entries for the Time Zone Experiences table for 2009. Here is the time zone chart from 2008. Last year, the students created audio podcasts for various time periods and months. We will do the same again this year. The students really enjoyed using Garageband.
Reflections Once all the student work is completed, we will add to the Voicethread reflections Lisa set up.
Independent Project This is a project that relies on participation from other schools so that the students can appreciate other student perspectives around the globe. The nice part about the project is that we do not have to have any particular deadlines. Classrooms can participate and add to the wiki as it suits their needs. We will also be able to look at last years work.
Is It Something You'd Like to Do? If this project interests you, please let me know via this blog, the wiki, Twitter, or any other venue in which we connect. I will add your Wikispaces id to the wiki. You do not have to update the tables on the wiki with your class information until you are ready to update the table and begin adding your student's research and creative content.
Gimp is a great tool for creating images. One of the problems that I encounter in class is losing tools because students close the windows. I finally took the time to learn about the preference that controls the windows.
Gimp's Standard Tools When Gimp is first installed, it comes with several very useful tool windows activated:
Most of these tools are used in our sixth, seven, and eighth grade Gimp projects. It is frustrating to the students when a window disappears. Today I took the time to look at Preferences.
Gimp Versions Depending on the age of the machine, I happen to have a few versions of Gimp running. In Gimp version 2.4.6, I found the option under File - Preferences. In version 2.6, preferences is on the Edit menu. I plan on spending more time looking through the preference settings, but the one I required to fix my disappearing tool windows is located in Window Management.
Window Management
The first thing I did was to click the Reset Saved Windows Positions to Default Values button. I quit Gimp, restarted, then positioned the windows exactly where I wanted them on each computer. It varies depending upon the type of machine and its monitor size. I quit again, so that it would save the window position when I exited. Finally, I restarted Gimp and removed the x from the Save window positions on exit option.
I'm really looking forward to starting Gimp with the sixth grade! All the headaches of disappearing and rearranged tool windows from previous years are behind me.
One of the first series of lessons I created as a computer teacher were for the sixth, seventh and eighth grade students. I had seen many presentations in my time in the business world and found most adults did a fair to poor job. They had too many words, their images were blurry, they jingled change in the pockets as they spoke, and they had many other little "sins".
First Year The first year, I created a project I called Dinner with Famous Guests. I got the idea from a book I had purchased. Unfortunately, I don't know the name. It asked, "Which four famous people would you invite to dinner and why?". I asked my friends and family the question at dinner one night and it became quite a lively and interesting conversation. I used that question as the basis for this project.
All three grade levels had a great time creating and presenting their four guests.
Second Year The second year, I had to come up with a new twist to researching and creating a presentation. I had become familiar with the students and thought it might be interesting to learn more about them. The Something You Probably Don't Know About Me project was born. I have learned about the many talents and interests of my students. Each year, I start the project with my own presentation and I've come to rotate them based on the group of students. I either share my minor ability to play the piano, my travel to visit my father's family in Ireland, or the collection of paper money from around the world that I started when I worked for the container ship company, Sea-Land Service.
This presentation helps the students review the PowerPoint skills and talking in front of a group.
Third Year Finally, I had to find a project for my eighth grade students. As they enter high school, they may have to create a more research-based presentation. I had found a web quest called the Time Travel Agency. It was the jumping off point that I needed. I have the details on my wiki. It is called Welcome to My Decade. In order to be fair, I group the students with one or two partners. I find out who is interested in a particular decade. If only one group is interested in a given decade, it is theirs. Otherwise, we draw from a hat. They are to gather research to make the idea of traveling to another decade the most interesting. After the presentations, we vote on which decade the most students would like to visit.
Changes From Year to Year At the beginning, my rubrics were related to the operation of the software. As time has passed, I've become more interested in the stories the students are telling and how they relate to their audience.
This past year, we were very lucky. We received two Sony digital video cameras. I had the students learn to use the recorder. I dumped the video to my hard drive and edited them so that each student had one short video. I paired the students up and had them watch their video and their partner's video together with a rating sheet. You'll find the rating sheet on the wiki in the sixth, seventh, or eighth grade PowerPoint section.
Next year will be the first year the students are armed with a reminder of their previous year's presentation. It will be interesting to see what impact it has on their presentation style.
More Improvements for the Year Ahead This past year, we received 20 tablet PCs from the Win a Wireless Lab promotion. It has run every year for the last six or seven years from January until early May. If you are not aware of the promotion, it is amazing! Be sure to enter every day.
As a result of presentations given to the eighth grade social studies teacher, I learned that the lessons I am try to teach about keeping words on the slide to a minimum and images to a maximum are not translating out of the computer lab. I will have to make a bigger effort in leading a discussion around this topic. I will probably show the video at the top of the screen to the students before we work on PowerPoint this year. The comedian, Don McMillian, has a newer version on MySpace video. Since MySpace is blocked at school, I will have to use Zamzar to download the video. It might make sense to start with the newer video before our work. As a recap, I can show the video at the top of the screen to close out our work. They can complete a self survey at the end to rate themselves on how successful they were with their slides.
Every year, I try to have a theme that extends through the discussions all year. Last year, the students in the middle school grades worked on the concepts of copyright, fair use, and creative commons. This year, I want to work with all grades on creativity and sharing through the computer.
Multiple Intelligences I have a real interest in the concept of multiple intelligences. At one point in teaching middle school math classes, I would end each chapter with a chapter closing project. Each was small in scope. My intent was to give the students a choice in demonstrating their knowledge of the concepts in that chapter. I never discussed multiple intelligences with the students. It was interesting to see the types of choices they made.
As we discuss creativity and sharing, I do want to make an effort to give the students an opportunity to learn about the idea of learning styles. I found an interesting multiple intelligences inventory online today. It is from the Learning Disabilities Resource Community. I took the inventory and it seems like the students in the middle school should have no problem with any of the questions. I might try it with the fifth grade students, too.
Creativity There are so many ways to be creative with various computer components and applications. As we work on each project, I would like to talk about how we are being creative. Whether it is the written word in a word processor, logic when building Scratch projects, musical in Garageband, spatial with the GPS, or any other number of projects - we are being creative!
Sharing Another overarching theme I would like to work on is "How Are You Contributing to the World's Knowledge". There are several resources the students have created over the last eight years. Most recently, the work has been more public. I will be able to show the students reflections and work from students who are now in high school. I want them to think more about how they, as students, can teach others.
Planning I'm in the planning stages right now. I like the fact that everything we usually do in K-8 will fit into this framework. As always, I'm excited to be planning for another new year!
I've spent the last couple of weeks going through my lessons from the 2008-2009 school year. It's a good time of year to review what each class has accomplished and begin planning for the 2009-2010 school year. I have the Kid Pix and Word lessons pretty well updated (see side bar on the web page). Now, I've decided it's time to add the Gimp lessons.
Gimp and Middle School I am sure fifth grade students could handle Gimp, but I really don't have a need for the program below the middle school grades. Kid Pix is fine. In the middle school grades, I like to introduce the students to a program that is a little more sophisticated. The Gimp web site states: "Gimp is a freely distributed piece of software for such tasks as photo retouching, image composition, and image authoring". I like to use it to create GIF animations with the students. I begin to acquaint the students with the program in the sixth grade.
Lessons Online I am working to update my lesson plan wiki now with the lessons for sixth through eighth grade. The sixth grade lessons are complete as of today. I will begin writing up my GIF animation lesson this week for the seventh grade students.
In previous years, I started using Gimp with the seventh grade. This eighth grade class will be the first to use Gimp for three years. I barely scratch the surface with the avatar creation and the animations. I'm looking forward to planning a new project for this year's eighth grade computer class.
Image Citation: Avatar created in Gimp by my son, Stephen.
Taking It Global I am working on a Google document. I have started outlining what I accomplished with my third grade students. I am adding things I would like to include in the project next year. I want to add a collaborative component. I am hoping to find other teachers to join the document and consider having their students work with mine and others around the globe as a Flock of Researchers.
I'm borrowing heavily from the layout of the Monster Project, Middle School 1001 Flat Tales, and Winter Wonderland wikis. I will begin outlining some major components over the next couple of weeks. It is my intention to start the project around December and have students contribute through May. Work could be done as teachers have time available with their students.
General Outline I am including a link to the Google doc here. If you are interested in brainstorming more about this project idea, please let me know [AnnNJTechTeacher {at} gmail {dot} com] and I will send you an invitation to edit the document and/ or the wiki I'm developing. Please tell me where you heard about the project, too.
The younger the students are when we introduce the concept of copyright and citations, the more likely it will be on their mind as they grow older and work on reports. I think the tie-in to image citations is a nice first step.
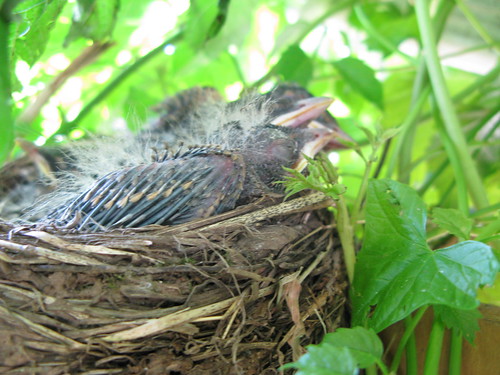
Image Citation: Oro, Ann. Baby Robins in Nest 5. 2009 June 17. 2009 June 3. http://www.flickr.com/photos/njtechteacher/3593708408/
I'm not sure how long ago I heard about geocaching. From the first time I heard about it, I knew I had to try it with my students. I had my first opportunity yesterday. The image includes my son holding the first cache we found.
Planning, Planning, Planning This year, I had a bit of money left in the technology funding budget to purchase a Garmin etrex Venture HC. I have no experience with geocaching, so I've been collecting bookmarks for a while.
I kept trying to figure out how to arrange a field trip or a class period or two with the GPS and finally realized that our annual walk-a-thon/ field day would be perfect.
The DEN decided to have a Geocaching Day and in preparation they had a few webinars scheduled. Last week, I sat through the archived event and was really happy with the content. The event was led by Bridget Belardi. She has a nice wiki page on geocaching and it includes lots of teacher resources and her set of slides from the webinar.
I put together a short flipchart in Activstudio to get a feel for what students knew about geocaching, explain the activity, and let students register to try it on the field day.
Explaining Geocaching in the Classroom I took some photos from the web to show what a geocache could look like. I asked questions like:
What is a geocache?
What is required?
What would you be looking for?
Next we took a look at an image of satellites circling the globe and I helped the students understand the concept of needing at least three satellites to get a lock on your position on the GPS unit.
Only one student had ever heard of geocaching and that same student had found all the caches at this park with his family. A fair number of students wanted to try geocaching at the park. In advance of the field day I thought I would have to hide a geocache, but was stunned to find someone had already hidden a themes worth of caches. There are seven named after the Seven Dwarfs. Each cache has a number that will lead to the Snow White cache.
The Day Arrives After a walk from the school to the park, I got out my list of seventh grade students who expressed an interest in trying geocaching. The students were tired from the walk and wanted to sit and watch a baseball game. Some sixth grade students overheard that I was trying to get a group to try the geocaching and wanted to go instead.
As we walked, I explained what we were going to do. They had a lot of fun following the arrow on the GPS unit. I knew, in advance, that the geocaches were all off the path that goes around the park. It took a bit to convince the students that we couldn't simply follow the GPS directions to head west because we would have to walk through a pond.
I was impressed with how well the unit worked! It was a really overcast day and I heard that some GPS units have trouble with cloud cover. This unit worked like a champ. We finally closed in to within 20 feet of the cache. I explained that we may not get a better lock on the location than 20 feet, so we started looking. My son had the unit at that point and actually got within 5 feet of the cache with the GPS.
I was a little worried that the students would get tired of hunting before we found the cache. They were really surprised that I didn't know where the cache was and that a stranger hid it. Luckily, I noticed a hole in a tree and what looked like a film canaster. I asked for a volunteer to reach in and get it. Sure enough, it was the cache. It was hidden in an M&M tube that was covered in camoflague contact paper. Inside was a little pen and a scroll of paper to sign.
They immediately wanted to find another cache. We tried another. This time, it was a really tiny two inch canaster covered in black tape and attached to a tree limb with a twist tie. It took a lot of searching, but armed with the excitment of having found one, they were determined to find this cache.
They would have liked to have found a third, but I wanted to see if I could take another group out. Unfortunately, by the time we got back, it was almost time to walk back to school.
Ideas for Next Year A lot of teachers were really interested in what we were doing. I want to find a grade level and do a really thorough job of tying geocaching into the curriculum. There are so many ways to do this: longitude and latitude, measuring feet and fractions of miles, compass points, or hiding our own cache with a travel bug inside.
One of the many benefits of summer vacation is the luxury of planning time. I can't wait to do this over the coming years with many more students.
Last year, I explored Kerpoof with my students. As the year wraps up, I wanted to revisit the site. This year, I signed up for a teacher account and I'm learning how that can help me in the classroom.
It was very easy to create a class id and add student ids within the account. A really nice feature is the ability to print login cards. It lists the web site address (www.kerpoof.com/student), student nickname, student password, and class id all in one convenient card.
The students had no trouble signing in. At this point, I have the Group Chat and the Group Message Board turned off. After working with the students on the website this week, I now realize I will have to turn on the Group Message Board in order to post drawings and comment on projects within the class.
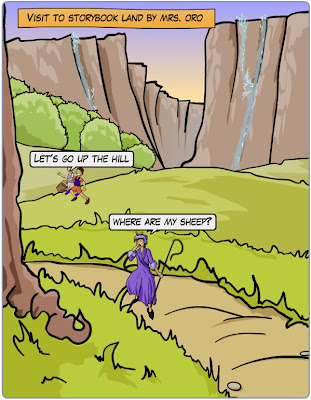
Student Discoveries We followed the same project that I created last year. I had the students all select the same background shown on the right. It forces the program to display storybook characters in the list of images that can be selected for the story.
The students add characters and dialog bubbles to build a story of what happens in Storybook Land. Last year, the students would become frustrated when they wanted a particular image. As images are dragged on the drawing, some disappear and are replaced.
Today, one of the students pointed out the search box beneath the images. I'm pretty sure it was not there last year. He demonstrated typing princess and clicking Go brings up princess images. He even tried it for ninjas and had success - much to his delight.
It works well with the flat screen iMacs and even runs without too much lag on the older 600MHz Power PC iMacs. I will try this program again next year, with the message boards, so see if we can privately post our drawings and leave comments for each other. The message board is moderated on the teacher side, so it will give us a safe place to practice appropriate messages.
I continue to be happy with this program and look forward to generating more project ideas in the 2009-2010 school year.
This past week, my sixth through eighth grade students explored Google Docs for the first time. I learned a lot working with the students. Early in the week, I noticed a lot of confusion with the editing. There were some problems with work being overwritten. There was also confusion about signing on to the system because I had two different types of email - some at mrsoro.com and some at gmail.com. I think I had found some great solutions by Friday's class.
Too Many Editors Spoil the Soup I had eleven questions and up to eighteen editors. When everyone tried to answer question one, a bit of chaos ensued. By Friday, I set up the document a little differently. Instead of a list of questions with blank spaces between the questions, I typed the mailbox ids.
For example:
1) What did you do with the tablets this year? Social Studies mailbox1: We wrote reports on different places in the world. mailbox2: reasearch mailbox3:Looking up stuff mailbox4: geography mailbox5: researched mailbox6: we used them to type our where in the world and where in the U.S.a are you mailbox7: We use them to do "Where in the World?" (geography). mailbox8:research mailbox9: printing a little paragraph mailbox10: we did the where in the world am i? sms200701: sms200702: where in the world report sms200703: 5 themes of geography
How Did This Help? Everyone knew which id they used to sign on to Google Docs. They simply typed next to their id. There was no problem with work getting deleted or overwritten. Earlier in the week, I heard a lot of frustrated voices. On Friday, everyone just worked!
Multiple Mailbox Solution I am really excited about the solution I now have for multiple email mailboxes. In my last post, Vicky left a comment about how she was planning on working around the ids. This morning, I opened up my doteasy account to see how mailboxes could be handled. One of their options is setting up email aliases.
Under the email section, I selected Manage/ Create Email Accounts. There, I found a Domain Settings link for Email Aliases. When I chose Add Alias, I was given a screen to set a new email id and a pointer to a destination email. I had been able to set up mailbox1 through mailbox10 [at] mrsoro.com. I added mailbox11 and pointed it at my main mailbox at mrsoro.com.
Next, I went to Google Apps and created a new account for mailbox11. Once the account was created, I received a message that I needed to sign on to my email and follow a link to confirm the account. There, in my main email account, was the email for mailbox11! Now with aliases, I believe I can set up the full 21 accounts I need. In truth, I can probably set up an account for each student! I'll have to see if there are limits to aliases.
Now, I'll have one way for everyone to sign on and we'll really be able to explore Google Apps next year. I'm so glad I gave it a test run because I have all I need to begin planning new lessons for the 2009-2010 school year!
Weekend Preparations I've wanted to use Google Docs with students for over a year, but the logistics kept holding me back. I have not wanted to create a bunch of email ids in Google and I'm not sure if the gmail trick works with Google Docs. I am especially intrigued by the possibility of Google Apps for Education, but have to figure out how to get a large quantity of school email addresses. I'm not sure if it's even an option.
In the meanwhile, I do host a website at www.mrsoro.com and it gives me the ability to create up to ten email ids. This past July, I signed up for a Google Apps account with my mrsoro.com email id. It was easy to do, but I never took the time to use the account any further.
I've also been setting up a few gmail accounts here and there to give students access to Google Reader while working on the Middle School 1001 Flat Tales project. When all was said and done, I had enough accounts for everyone to work.
The Plan for the Class I wanted to introduce the concept of Google Docs and collaborative editing. All the students have experience editing a wiki. I started a discussion with the students. We talked about:
how they would describe a wiki to someone who hadn't heard of them before
how they would describe Microsoft Word
how they could work on the same document with a school partner from home
the limitations and problems associated with sending a document as an email attachment
The students did a great job explaining that a wiki is an editable web page. They felt they would send the document as an email attachment. The problems included the possibility of sending a virus through the attachment, not having a personal email id and needing the help of a parent, and multiple versions of the same document.
The Student's Reaction Overall, it was a bit overwhelming having between eleven and eighteen students answering the same twelve questions at the same time. They got a bit frustrated having work overwritten at times. The questions were related to the tablet pcs we have on the second floor this year. I asked them to talk about the types of projects they did this year, what caused trouble as they worked on the tablets, how Open Office Impress and Writer worked as compared to Microsoft Office, projects they'd like to do in their subject classes next year (with the tablets), and things they would like to learn in computer class next year.
The last question asked about their experience using Google Docs today. The responses were more positive than negative and included:
I thought it was pretty cool...great...fun and easy...fun, easy, and awesome...it was fun...it was cool...it's like instant messaging your friends what you are editing...I like it. It's fun because you can see other people's thoughts...I liked it. I had fun working on it...It was good. I didn't have a problem with it...it was fine...it was easy...it was funnnnn and easy...it was very easy, honestly, not that fun...it was confusing so I changed my color...I didn't like it...people kept deleting stuff and changing it...it was ok.
For the Future I will definitely use Google Docs next year. I will not have such a massive, simultaneous edit, though. I can especially see using the spreadsheet in class. It will be a time saver in populating a spreadsheet with a lot of individual data. I used to question the students around the room and each student would type each answer into the spreadsheet. Now I can set up all the names and titles in the spreadsheet and the students can fill in their individual row or column. Afterward, the students can save the file as an Excel document on their local drive. We will be able to open it and then they can manipulate the files individually.
I will certainly use the Google presentation with the eighth grade. I have had the students create a Time Travel agency PowerPoint in groups, but it leave a lot of students sitting while one student does the bulk of the work. This year, I had each student create their own Time Travel PowerPoint, but the number of slides and research really took longer than I wanted when the students worked alone.
The overall experience was good. I now have concrete experience with the students that I can build on over the summer as I prepare for the 2009-2010 school year.
My students are used to using Microsoft Word and Open Office Writer in school. Both programs include visual cues to spelling and grammar errors. We discuss the reason for the red and green squiggles from the time the students start typing in Kindergarten. This year, I found a great new way to introduce the concept.
I was able to adapt the lesson to my third through fifth grade students this past week. She has three poems. I only used the first poem with third grade. We used two poems in fourth and fifth. Some of the quicker students also worked on the third poem.
Introducing the Lesson Since we have an Activboard in the computer lab, I decided to extend the lesson a bit. First, I brought up the smallest poem titled The Spell Checker Poem by Mark Eckman. Word found three errors: Eckman, the word it on the second line of the poem, and the homonym your.
I was happy that all grades understand that Eckman is not in the dictionary, it is a person's last name, and is really not a spelling error. All three grades had a student point out that the grammar checker thought a period was missing in the first line of the poem. We had a short discussion on poetry and punctuation. Finally, the students realized your should have been written you're. We were doing a great job.
Using the Activboard I opened up Activstudio, copied, then pasted the text of the poem into a text block on a flip chart page. I used the same methodology that I used with the Activboard Adjectives lesson. I demonstrated how the paint bucket could either paint the page or a word on the page.
We went around the room and the students took turns coming up to the board to identify words that really were spelled incorrectly. They had fun choosing the paint bucket color and coloring in the word. If a student chose incorrectly, I used the keyboard shortcut to Edit - Undo and the pen continued to be passed around the room.
Once all the words were identified, I had the students use the pen to write the correct spelling of the word.
It was a great lesson.
Extending the Work The third grade students had been working on typing a document called The ABCs of Me in the previous class. It was leading up to my standard spell check lesson for the third grade. They opened their completed Word document and used the spell checker to check their work. They used their eyes and knowledge of the English language to finish proofreading before they printed.
The fourth and fifth grade learned to use the highlighter tool in Word. They opened the three poems from Vicky's lesson from the file server. They spent the remaining fifteen or twenty minutes to find all they mistakes they could.
Closing the Lesson Next week, I will have the students open their highlighted file. I will bring up the corrected poem and they will check their own work. I was really happy with this lesson. I look forward to returning to the lesson next year with the third and fourth grade as a recurring lesson.
One of the jobs a student can have when they grow up is that of a software tester. This past week we tested a different version of Kid Pix.
Problems with the Current Version We currently use Kid Pix 4 for Schools. I changed from Kid Pix Deluxe 3 when the Intel Macs had to be purchased for the classroom. Version three only worked for Power PC machines.
Version four tends to freeze at times on the Intel Macs. Once the program freezes, I can use a keyboard shortcut to save the work, restart the program, and reload the file.
This past week, I received a trial version of HyperStudio and with it came Kid Pix Deluxe 3X.
Software Tester's Job It would be impossible to give the software a real workout by myself. I have been introducing the job of a software tester to the students. I explain that every piece of software has to be tested before it is sold. In a company, the software tester tries all the different options and tries to find out what might make it break.
The students are enjoying finding the differences between the two versions of the product. They like the new water hose that erases pictures. It has not frozen on the Intel Macs once.
It did loose the arrow to select colors on one Power PC machine and the program shut down consistently with one wacky brush.
We will continue to test the program this week. I will have to take a look at the two PowerPC machines and see if they have less memory than the other PowerPCs in the room. If so, Kid Pix Deluxe 3X might be just what is needed in the computer lab.
 I'm gearing up to work with drawing monsters with my second grade students on the wiki Anna Baralt and I started a few years ago. At the end of the project last year, I put together a Voicethread to find out what we can do better. I am making some adjustments that reflect those comments. I hope it continues to be a great experience for all involved.